
If your mouse scrolls in the opposite direction from what feels natural to you, you don’t have to put up with it. Whether you prefer the traditional Windows-style direction or the smoother “natural” scrolling used on many touch devices, changing the setting only takes a few minutes.
Here’s how to reverse your mouse’s scroll direction on Windows 10, Windows 11, and Mac.
Windows 11: Use the Built-in Setting
Windows 11 includes a straightforward option for changing the scroll direction:
- Open Settings (press Win button and type “Settings”)
- Go to Bluetooth & devices.
- Select Mouse.
- Look for the scrolling direction option.
- Choose the direction that feels natural to you.
You can switch it back at any time, so it’s worth trying both directions for a day or two before deciding which one you prefer.
Windows 10: Edit the Windows Registry Setting
Windows 10 doesn’t offer the same simple toggle in the standard mouse settings, but you can change the direction through the Windows Registry.
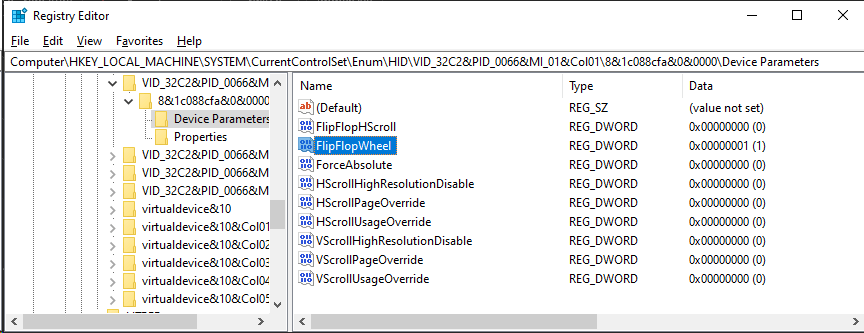
This hack was shared by Jonathan Barton, a very happy Rotary Mouse user who bought two units. The setting you need is called FlipFlopWheel. Changing it from 0 to 1 reverses the scrolling direction.
Step 1: Find Your Mouse’s Device ID
The easiest way to identify the right device is with PowerShell:
- Press Start and search for PowerShell.
- Open PowerShell.
- Run this command:
Get-PnpDevice -Class Mouse -Status OK | Select-Object InstanceId - Then, unplug your mouse or its wireless receiver and run the command again.
- Compare the two lists. The entry that disappears is the device ID you need.
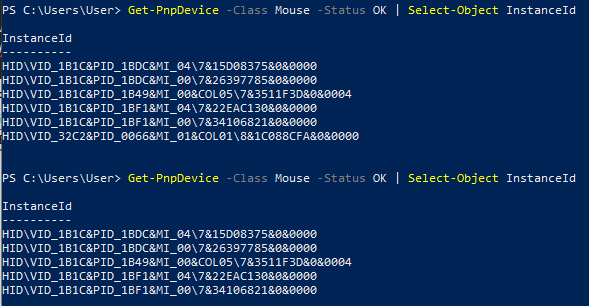
Sometimes a wireless receiver may appear as a keyboard rather than a mouse. If that happens, no worries because it can still be the correct receiver. You can also open the Devices and Printers window by pressing Win + R to enter control printers to help identify the connected device.
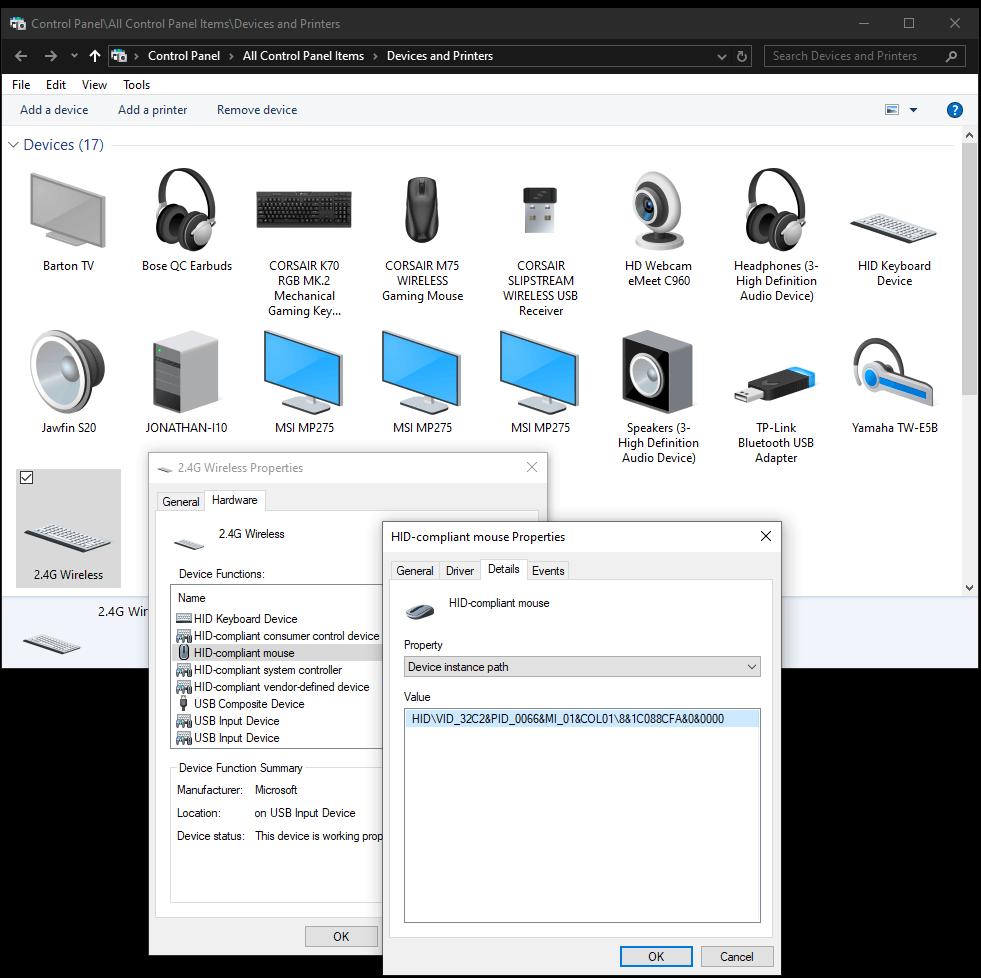
Step 2: Open the Registry Editor
- Press Win + R.
- Type
regedit. - Press Enter.
- Approve the permission prompt if Windows asks.
It’s always a good idea to create a restore point or export the relevant registry key before you proceed in changing your Registry. Its very powerful, so take your time and make sure you’re editing the correct device.
Step 3: Locate the device parameters
In Registry Editor, navigate to HKEY_LOCAL_MACHINE\SYSTEM\CurrentControlSet\Enum\HID
Inside the HID folder, look for the folder that matches the device ID you found in PowerShell. Continue opening the folders until you reach Device Parameters. Next, in that folder, find the value named, FlipFlopWheel.
Open it and change the value from 0 to 1. Then, restart your computer, reconnect your mouse, and test the scroll direction. If it still feels backwards, switch the value back to 0.
An Easy Alternative Method for Windows 10
If you don’t like tweaking your Windows Registry or find that the method above is too overwhelming, you can install the X-Mouse Button Control free software to reverse the mouse scrolling direction.
Mac: Turn off Natural Scrolling
Mac comes with a built-in function for this. The setting is available directly under System Settings. Just follow the steps below.
- Open the Apple menu.
- Select System Settings. On older versions of macOS, this may be called System Preferences.
- Open Mouse or Trackpad, depending on where the device appears.
- Turn off Scroll direction: Natural.
This changes the direction to match the traditional Windows-style scrolling behavior.
Give Yourself Some Time to Adjust
Changing the scroll direction can feel strange for the first few minutes, especially if you’ve used the same setting for years. Try your new preference for a day or two before switching back. Once your muscle memory catches up, scrolling should feel much more natural.
You can always return to the original setting if the new direction doesn’t work for you. Happy scrolling!